1.3.3.8.4. blockdiag Directive - Network Diagram
Requirements:
Install:
sphinxcontrib-nwdiagvia Python pip (Included in SPHINX_ENV_INSTALL, Sphinx Environment)Add
sphinxcontrib.nwdiagto Sphinx extentions in conf.py (Included in SPHINX_ENV_INSTALL, Sphinx Environment via defaults.py)
This is your .rst file code example to create a Network Diagram http://blockdiag.com/en/nwdiag/index.html:
Option |
Values |
|---|---|
:align: |
left, center or right |
:scale: |
0-100 percentage value |
:caption: |
text to label Figure |
:name: |
text to create hyperlink for sphinx (no spaces) |
:desctable: |
Adds description table as shown in example. (no spaces in labels) But this is not recommended due to paging issues in latexpdf |
Color |
Hexidecimal Code |
|---|---|
Black |
#000000 |
White |
#FFFFFF |
Red |
#FF0000 |
Green |
#00FF00 |
Blue |
#0000FF |
Yellow |
#FFFF00 |
Cyan |
#00FFFF |
Magenta |
#FF00FF |
Note
In the code-block color uses Hexidecimal values for color assignment to the “network” or a “group of objects”. It is optional.
.. nwdiag::
    :align: center
    :caption: Example - Network Diagram
    :name: triton_coe_test_nwdiag
    :scale: 90

    nwdiag {
        inet [shape = cloud];
        inet -- router;
        group {
            color = "#00FFFF";
            router;
            web_server01;
            web_server02;
        }
        network dmz {
            address = "192.168.0.0/24"
            color = "#FF0000";
            web_server01 [address = "192.168.0.1, 192.168.0.10"];
            web_server02 [address = "192.168.0.2"];
            router [address = "192.168.0.254"];
        }
        network internal {
            address = "172.0.0.0/24";
            color = "#00FF00";
            web_server01 [address = "172.0.0.1"];
            database_server [address = "172.0.0.2"];
        }
    }
The previous code-block will generate this Network Diagram:
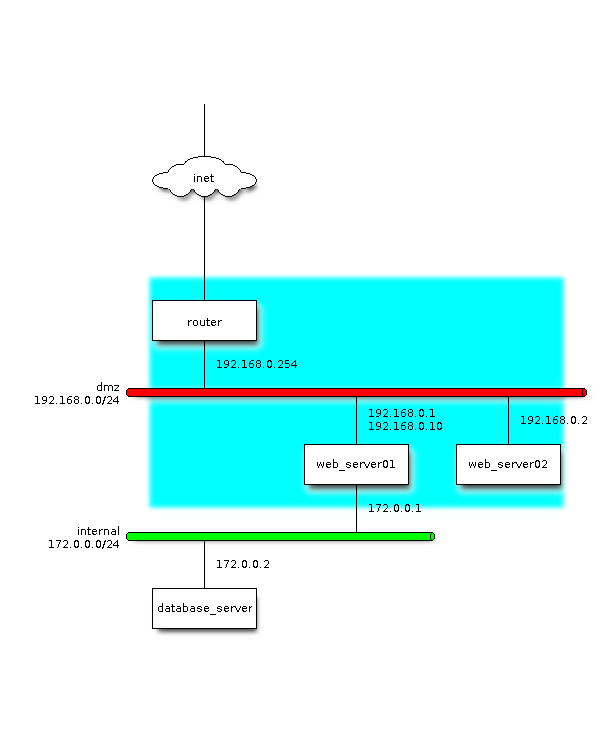
Figure 1.5 Example - Network Diagram